This year’s fantastic Hackathon at immobilenscout24.de in Berlin, offered me a productive environment (Club-Mate, pizza and really nice talks to really smart people) to dive deeper in the wiring of Selenium and FitNesse. And here we go:
Prerequisites
Read this article to find an overview of testing-frameworks and their use for acceptance testing.
Read Specification by Example, as FitNesse is a cool tool for that approach.
Read my guide to setup Selenium.
Read my guide to setup FitNesse.
Prologue
My primary goal, that I want to accomplish with any acceptance-test-framework: I want the non-programmers (managers, product owner, …) to understand which tests are implemented for their web-application yet – and which tests are still missing. I want to be sure, that the tests I (as a test-automater) have in my mind, really meet the requirements. The responsibles for the business-logic of a web-application should be able to check that at a glance. Additionally I like to give them a tool to easily change/enhance the test-data and simply push a test-button to get immediate feedback from their web-application (or its staging page). And yes, I’m really talking about automated functional tests with Selenium WebDriver.
Concrete
I’m presenting a really simple example to just show one possible wiring between Selenium and Fitnesse (without using Page Object-Pattern and just running Selenium locally).
In the specification we have everything lovely included: descriptive text, nice pictures/drafts of your feature and you have a button that executes the specifiation of that feature = the feature-test:

This pretty specification was created with that piece of code:
!*&amp;lt; [configurations] !define TEST_SYSTEM {slim} !path C:\Users\IT Kosmopolit\Dropbox\IT Kosmopolit\Blogging\Fitnesse !path C:\Users\IT Kosmopolit\Dropbox\IT Kosmopolit\Blogging\Fitnesse\selenium-server-2.28.0\selenium-2.28.0\selenium-server-standalone-2.28.0.jar |import| |de.itkosmopolit.fixtures| *! Test if the page title is displayed correct (case-sensitive), after search for "Cheese!" !img http://www.public-domain-image.com/cache/food-and-drink-public-domain-images-pictures/cheese-public-domain-images-pictures/port-salut-cheese_w128.jpg |Test Google page title| |textInTitle|isTitleCorrect?| |Google|yes| |google|no| |bing|no|With !*< [configurations] I start an invisible block.
With!define TEST_SYSTEMI select the engine.
With!pathI define a classpath.
|import|works like an import statement
Simple text doesn’t need any mark-up – just write it down.
!imgbrings us an image to the wiki-page.
And with|something|you start a table.
To dive deeper into the subject: In the TwoMinuteExample you find general information about the decision table, a main concept in FitNesse. In the MarkupLanguagReference you find more information about the markup I’ve used in the wiki-page:
If you like to have this nice specification on your computer, too:
1.) execute „localhost“ in the address-bar (be sure to have set up FitNesse on your computer)
2.) push the Add-button
3.) select Test page
4.) write GoogleBasicTest for the Page name
5.) delete the default in the code box (!contents -R2 -g -p -f -h)
6.) copy&paste the above code in the code box
7.) click save
You can find your page under: http://localhost/GoogleBasicTest now.
Note: Be sure to name your future wiki-pages as WikiWords.
Now you have a cool specification, but it’s not doing anything valuable, if you push the Test-button. FitNesse uses so-called fixtures to wire a wiki-page with the Application Under Test. I appreciate the decision table as a plain, clear, noise-less way of defining all the scenarios of a feature (*waving at Gherkin*) – so find the appropriate description here. Note: Every row in the decision table represents one scenario.
Go to the folder in which your fitnesse-standalone.jar resides. Create there the folder-structure: de\itkosmopolit\fixtures, open an editor, copy&paste the following code in it and save it with the name TestGooglePageTitle.java (compare this name with the title of our decision table!)package de.itkosmopolit.fixtures; import org.openqa.selenium.By; import org.openqa.selenium.WebDriver; import org.openqa.selenium.WebElement; import org.openqa.selenium.firefox.FirefoxDriver; import java.util.List; public class TestGooglePageTitle { private String text; private String pageTitle; public void table(List &lt;list&lt;string&gt;&amp;gt; table) throws InterruptedException{ // Create a new instance of the html unit driver // Notice that the remainder of the code relies on the interface, // not the implementation. WebDriver driver = new FirefoxDriver(); // And now use this to visit Google driver.get("http://www.google.com"); // Find the text input element by its name WebElement element = driver.findElement(By.name("q")); // Enter something to search for element.sendKeys("Cheese!"); // Now submit the form. WebDriver will find the form for us from the element element.submit(); // Check the title of the page pageTitle = driver.getTitle(); driver.quit(); Thread.sleep(500); } public void setTextInTitle(String text) {this.text = text;} public String isTitleCorrect() { if (pageTitle.contains(text)) return "yes"; else return "no"; } }Note:
1.) Putting the Selenium code in the table-method feels a bit … hack-y, but … it works.
2.) Because of black magic, you need aThread.sleep()– otherwise while executing you’d get the wrong(!) error-message: „Testing was interupted and results are incomplete.“
Then compile it, e.g. with your Command Prompt: (being in the folder where fitnesse-standalone.jar resides)javac -classpath "pathToSeleniumJAR\selenium-server-standalone-x.y.z.jar" de\itkosmopolit\fixtures\TestGooglePageTitle.java
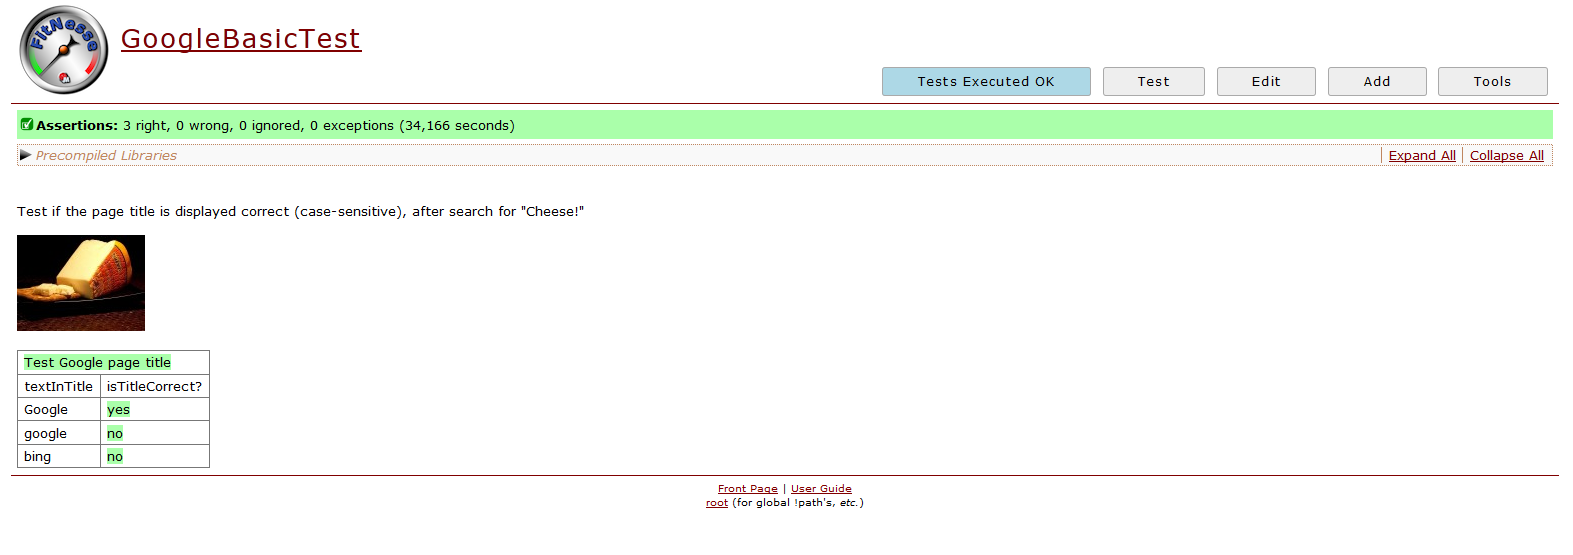
And after pushing the test button you find this result:
The results are beautiful and I’m quite confident, that Selenium WebDriver & FitNesse are becoming a new dreamteam in the future. Anyhow consider, that I haven’t seen this aproach running on large projects yet – there may be some challenges …</list


