
… or how to get YOUR Robot Framework test-report in less than 10 minutes!
Notes
- The official instruction for installing Robot Framework is a labyrinth (https://github.com/robotframework/robotframework/blob/master/INSTALL.rst#ironpython-installation)
- I counldn’t use the standard way (installation with a package-manager) probably because our enterprise firewall blocks the access to binaries on https://pypi.python.org/pypi
- I couldn’t use the Windows Installer for Robot Framework, because IronPython doesn’t configure the registry properly.
Installation architecture

Install Robot Framework from Source Code
1.) Download & install IronPython http://ironpython.net/download/
2.) Install elementtree (because it’s broken in current IronPython: https://github.com/IronLanguages/main/issues/968):
- Download & unzip elementtree-1.2.7-20070827-preview.zip (not version 1.2.6.!) from http://effbot.org/downloads/#elementtree
- Copy to C:\Program Files (x86)
- Open cmd & execute:
cd C:\Program Files (x86)\IronPython 2.7

ipy setup.py install
3.) Install Robot Framework:
- Download & unzip Robot Framework-x.y.tar.gz from https://pypi.python.org/pypi/robotframework#downloads
- Copy to C:\Program Files (x86)
- Execute in cmd:
cd "C:\Program Files (x86)\robotframework-2.9"

"C:\Program Files (x86)\IronPython 2.7\ipy.exe" setup.py install
4.) Add
C:\Program Files (x86)\IronPython 2.7;
to the PATH-variable.
5.) Restart cmd & check for success:
cd "C:\Program Files (x86)\robotframework-2.9\src\bin"

ipybot --version
![]()
Run an example testcase
1.) Save
*** Test Cases ***

My Test

    Should Be Equal    1    1
as Example.txt in C:\Program Files (x86)\robotframework-2.9\src\bin
2.) Execute in cmd:
ipybot Example.txt
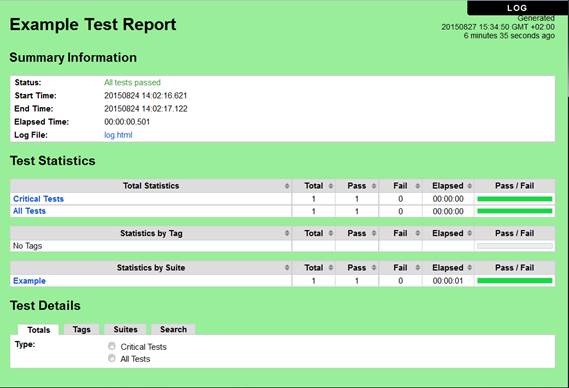
Create a test-report
1.) Execute in cmd:
ipyrebot output.xml
2.) Open report.html and enjoy the result:
For more information on Robot Framework read: https://it-kosmopolit.de/strategic-link-collection-of-robot-framework/
