Archiv der Kategorie: Java

Dreamteam: Selenium WebDriver and FitNesse

This year’s fantastic Hackathon at immobilenscout24.de in Berlin, offered me a productive environment (Club-Mate, pizza and really nice talks to really smart people) to dive deeper in the wiring of Selenium and FitNesse. And here we go:
Prerequisites
Read this article to find an overview of testing-frameworks and their use for acceptance testing.
Read Specification by Example, as FitNesse is a cool tool for that approach.
Read my guide to setup Selenium.
Read my guide to setup FitNesse.
Prologue
My primary goal, that I want to accomplish with any acceptance-test-framework: I want the non-programmers (managers, product owner, …) to understand which tests are implemented for their web-application yet – and which tests are still missing. I want to be sure, that the tests I (as a test-automater) have in my mind, really meet the requirements. The responsibles for the business-logic of a web-application should be able to check that at a glance. Additionally I like to give them a tool to easily change/enhance the test-data and simply push a test-button to get immediate feedback from their web-application (or its staging page). And yes, I’m really talking about automated functional tests with Selenium WebDriver.
Concrete
I’m presenting a really simple example to just show one possible wiring between Selenium and Fitnesse (without using Page Object-Pattern and just running Selenium locally).
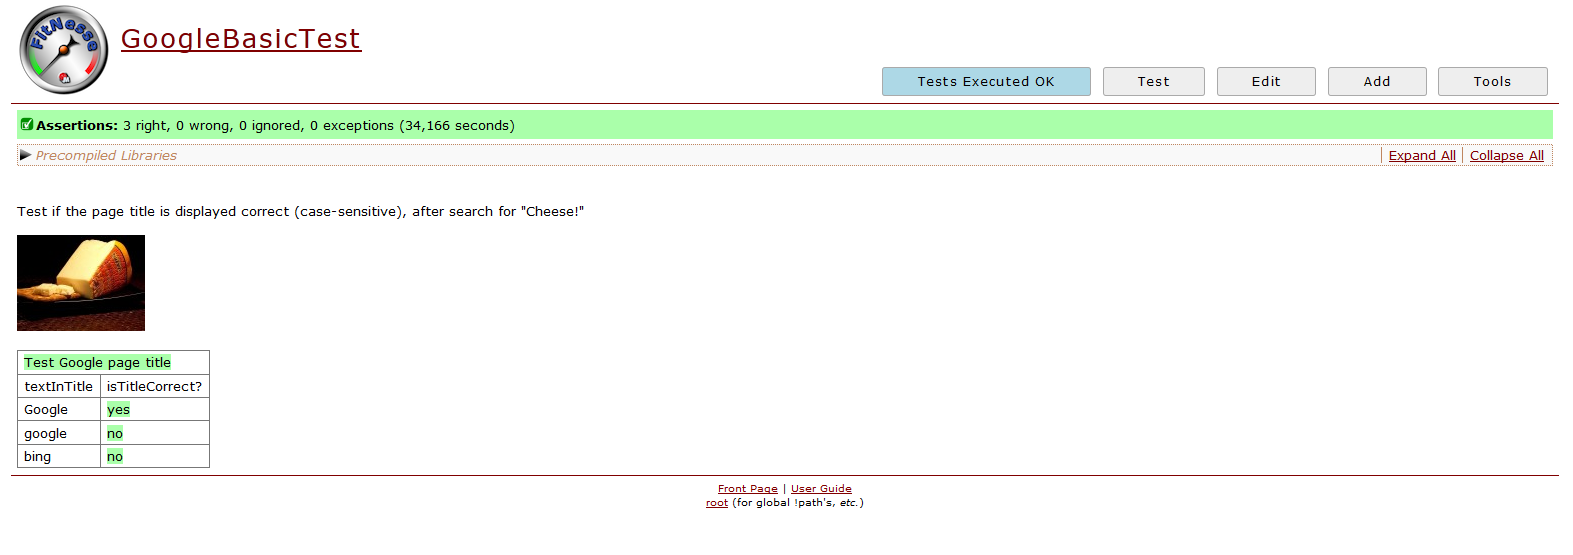
In the specification we have everything lovely included: descriptive text, nice pictures/drafts of your feature and you have a button that executes the specifiation of that feature = the feature-test:
wiki-page
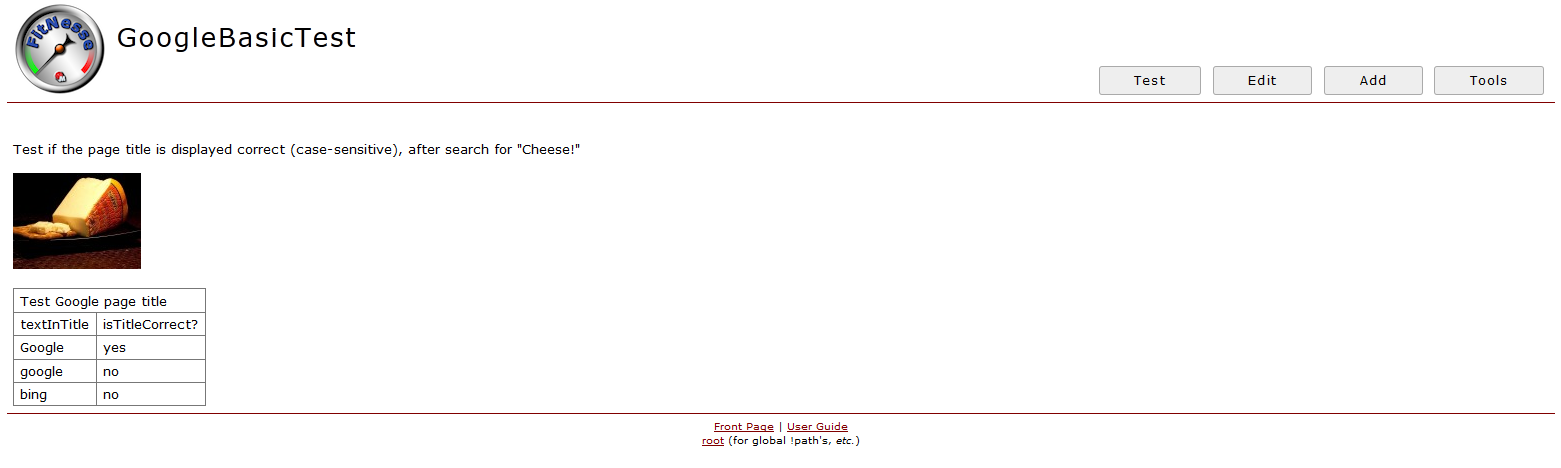
This pretty specification was created with that piece of code:

!*< [configurations]
!define TEST_SYSTEM {slim}
!path C:\Users\IT Kosmopolit\Dropbox\IT Kosmopolit\Blogging\Fitnesse
!path C:\Users\IT Kosmopolit\Dropbox\IT Kosmopolit\Blogging\Fitnesse\selenium-server-2.28.0\selenium-2.28.0\selenium-server-standalone-2.28.0.jar
|import|
|de.itkosmopolit.fixtures|
*!
Test if the page title is displayed correct (case-sensitive), after search for "Cheese!"
!img http://www.public-domain-image.com/cache/food-and-drink-public-domain-images-pictures/cheese-public-domain-images-pictures/port-salut-cheese_w128.jpg
|Test Google page title|
|textInTitle|isTitleCorrect?|
|Google|yes|
|google|no|
|bing|no|

With !*< [configurations] I start an invisible block.
With !define TEST_SYSTEM I select the engine.
With !path I define a classpath.
|import| works like an import statement
Simple text doesn’t need any mark-up – just write it down.
!img brings us an image to the wiki-page.
And with |something| you start a table.
To dive deeper into the subject: In the TwoMinuteExample you find general information about the decision table, a main concept in FitNesse. In the MarkupLanguagReference you find more information about the markup I’ve used in the wiki-page:
If you like to have this nice specification on your computer, too:
1.) execute „localhost“ in the address-bar (be sure to have set up FitNesse on your computer)
2.) push the Add-button
3.) select Test page
4.) write GoogleBasicTest for the Page name
5.) delete the default in the code box (!contents -R2 -g -p -f -h)
6.) copy&paste the above code in the code box
7.) click save
You can find your page under: http://localhost/GoogleBasicTest now.
Note: Be sure to name your future wiki-pages as WikiWords.
Now you have a cool specification, but it’s not doing anything valuable, if you push the Test-button. FitNesse uses so-called fixtures to wire a wiki-page with the Application Under Test. I appreciate the decision table as a plain, clear, noise-less way of defining all the scenarios of a feature (*waving at Gherkin*) – so find the appropriate description here. Note: Every row in the decision table represents one scenario.
Go to the folder in which your fitnesse-standalone.jar resides. Create there the folder-structure: de\itkosmopolit\fixtures, open an editor, copy&paste the following code in it and save it with the name TestGooglePageTitle.java (compare this name with the title of our decision table!)

package de.itkosmopolit.fixtures;
import org.openqa.selenium.By;
import org.openqa.selenium.WebDriver;
import org.openqa.selenium.WebElement;
import org.openqa.selenium.firefox.FirefoxDriver;
import java.util.List;
public class TestGooglePageTitle {
  private String text;
  private String pageTitle;
  public void table(List
&amp;lt;list&amp;lt;string&amp;gt;&amp;amp;gt; table) throws InterruptedException{
		// Create a new instance of the html unit driver
        // Notice that the remainder of the code relies on the interface,
        // not the implementation.
        WebDriver driver = new FirefoxDriver();
        // And now use this to visit Google
        driver.get("http://www.google.com");
        // Find the text input element by its name
        WebElement element = driver.findElement(By.name("q"));
        // Enter something to search for
        element.sendKeys("Cheese!");
        // Now submit the form. WebDriver will find the form for us from the element
        element.submit();
        // Check the title of the page
        pageTitle = driver.getTitle();
		driver.quit();
		Thread.sleep(500);
  }
  public void setTextInTitle(String text) {this.text = text;}
  public String isTitleCorrect() {
		if (pageTitle.contains(text)) return "yes";
		else return "no";
  }
}

Note:
1.) Putting the Selenium code in the table-method feels a bit … hack-y, but … it works.
2.) Because of black magic, you need a Thread.sleep() – otherwise while executing you’d get the wrong(!) error-message: „Testing was interupted and results are incomplete.“
Then compile it, e.g. with your Command Prompt: (being in the folder where fitnesse-standalone.jar resides) javac -classpath "pathToSeleniumJAR\selenium-server-standalone-x.y.z.jar" de\itkosmopolit\fixtures\TestGooglePageTitle.java
And after pushing the test button you find this result:
success_of_fitnesse
The results are beautiful and I’m quite confident, that Selenium WebDriver & FitNesse are becoming a new dreamteam in the future. Anyhow consider, that I haven’t seen this aproach running on large projects yet – there may be some challenges …

</list

Getting started with Selenium WebDriver in Java (Windows)

[renewed at 5 Dec 2018]
IMHO Java is the most popular programming language in the Selenium project, which means, that whenever you face a Selenium problem, the probability of finding the solution in Java is the highest. So start using Selenium in Java!
 
There are generelly 3 approches to get started with Selenium in Java:
Maven
The official one: Setting Up a Selenium-WebDriver Project
The sophisticated one (by Mark Collin, aka Ardesco): Selenium-Maven-Template
IDE
The official one: The 5 Minute Getting Started Guide Note: Here you find an example with HtmlUnitDriver. I experienced too often, that HtmlUnitDriver wasn’t working even with correct Selenium code, so I recommand not using it at all.
Without IDE, without Maven
This approach takes the most time but is the most back-to-the-roots one and shows best how Java works under the hood.
 

Approach without IDE, without Maven

Some backgrounds to Java
This paragraph is only a little refreshment for your aged Java knowledge. If you never had Java knowledge, you should go for a tutorial.
If you haven’t done yet, download the Java JDK from the download page (take the most actual Java Platform (JDK)). Execute it and follow the wizard. After that, set PATH.
The Java JDK not only comprises the JRE (jre.exe) – the JRE is the environment to run java-programs – but also the Java Compiler (javac.exe). The Compiler is necessary, because you have to compile the file of your source-code (yourname.java) to become an executable file. The result of that compilation is yourname.class. The program then can be executed by java yourname in your Command Prompt (after you navigated in the directory, where the yourname.class resides).
 
Selenium Setup
Download Selenium Standalone Server and put it e.g. on your desktop.
Selenium on Chrome works pretty out of the box: Download ChromeDriver, unzip it to e.g. the desktop and just run it.
If you want to run your tests on Internet Explorer, you need more time for configuration: look
 
Your first Selenium program
1.) Copy the following code in an editor and save it as Example.java e.g. on your Desktop:

import org.openqa.selenium.By;
import org.openqa.selenium.WebDriver;
import org.openqa.selenium.WebElement;
import org.openqa.selenium.chrome.ChromeDriver;
public class Example  {
    public static void main(String[] args) {
        // Create a new instance of the Chrome driver
        // Notice that the remainder of the code relies on the interface,
        // not the implementation.
        WebDriver driver = new ChromeDriver();
        // And now use this to visit Google
        driver.get("http://www.google.com");
        // Find the text input element by its name
        WebElement element = driver.findElement(By.name("q"));
        // Enter something to search for
        element.sendKeys("Cheese!");
        // Now submit the form. WebDriver will find the form for us from the element
        element.submit();
        // Check the title of the page
        System.out.println("Page title is: " + driver.getTitle());
    }
}

2.) As every Java program, it needs to be compiled. For the Java Compiler to find your Selenium library, you have to provide it in the so-called classpath. Execute the following in your Command Prompt (of course with the correct version number):

javac -classpath "%UserProfile%\Desktop\selenium-server-standalone-3.141.59.jar" %UserProfile%\Desktop\Example.java

3.) If everything is ok, you find Example.class on your desktop. Execute the following in your Command Prompt to run your first Selenium program (of course with the correct version number):

cd "%UserProfile%\Desktop

java -classpath .;"%UserProfile%\Desktop\selenium-server-standalone-3.141.59.jar" Example
… for historical reasons the JRE needs to point also to the actual folder, that is .;
 
Now Chrome should write „Cheese!“ in google search and finally you should find in the Command Prompt: „Page title is: Google“. The browser-window is not closing, as you might admire the results for some time!

Email-Korrespondenz in Selenium integrieren

Das häufigste Testszenario, in dem Emails integriert sind, ist der Registrierungsvorgang bei einer Internet-Anwendung. Nachdem der neue User das Kontaktdatenformular ausgefüllt und abgeschickt hat, bekommt er eine Email in die Mailbox, welche ein Sicherheitsmerkmal (Link, Passwort) enthält, dessen Benutzung die Registrierung erfolgreich abschließt.
Nun ist der Einsatz von Selenium weitgehend auf die Reichweite des Browsers beschränkt, will sagen, dass man nicht ohne andere Tools und Aufwand auf Mailclients (Outlook, Thunderbird, …) bei der Automatisierung der Tests zurückgreifen kann. Es gibt jedoch die Möglichkeit sich eines Webmail-Clients zu bedienen, der eine Administrationsoberfläche für Emails darstellt, die vollständig innerhalb eines Browsers bedient werden kann. Den Ansatz über einen Instant-Email-Dienst (spambog.com, instant-mail.de, …) zu gehen, empfehle ich für den produktiven Testeinsatz nicht, da diese im Emailempfang mindestens verzögert, wenn nicht gar gänzlich unzuverlässig sind. So hatte beispielsweise spambog.de bei einem Einsatz eine Verzögerung von genau einer Stunde. Bei meinem aktuellen Auftrag: www.hiorg-server.de wird ausdrücklich von der Nutzung von den bekannten Mailprovidern (web.de, hotmail.de, …) abgeraten, da manche Funktionen des hiorg-server.de dort als Spam gewertet werden (natürlich ohne es zu sein), weshalb diese Möglichkeit auch wegfällt. Ich nehme mal an, dass die meisten Tester mindestens einen Webspace mit eigener Domain und angeschlossenem Webmail-Client besitzen. Dies ist für den Standardgebrauch in Selenium ausreichend. Ich benutze für diesen Artikel Atmail, weshalb auch meine WebMail-Klasse auf diesen WebMailer ausgerichtet ist.
Die Auslagerung der Emailfunktionen in eine separate Mail-Klasse entspricht der Anforderung des Page Object Patterns, dass man die Navigation beliebig umbauen kann, ohne jedoch die Testklassen selbst ändern zu müssen. Dieses Design schließt auch ein, dass der domain part der Email-Adresse (wiki) nicht in der Testklasse auftaucht. Diese Testklasse kenne nur die Methoden der Mail-Klasse, ohne ihre Implementierungsdetails, also in unserem Fall:
new WebMail().getRegistrationText(String keywordInSubject, boolean löscheEmail)
1.) Das keywordInSubject ist notwendig, um die Email meines Threads eindeutig in meiner Mailbox zu identifizieren. Bei paralleler Ausführung unterschiedlicher Testcases (mit Email-Beteiligung) kann man naturgemäß als Tester nicht die Reihenfolge vorausahnen, wann welcher Thread die Mailbox erreicht, um dort „seine“ Email abzuholen. Hier entsteht also eine Race-Condition zwischen den parallel getesteten Testcases. Logiken, wie „nimm die erste Email in der Mailbox“ scheiden daher aus. Wir benötigen eine Möglichkeit wie der Thread „seine“ Email erkennt, diese also eindeutig in der Mailbox unterscheidbar ist.
2.) mit boolean löscheEmail kann ich mich entscheiden, ob nach der Prüfung die Registriermail gelöscht werden kann, um unseren Stall sauber zu halten…
Und hier der Code:
EmailTest.java

package de.hiorgserver.testhiorgserver;
import java.net.MalformedURLException;
import java.net.URL;
import java.util.concurrent.TimeUnit;
import org.openqa.selenium.WebDriver;
import org.openqa.selenium.remote.DesiredCapabilities;
import org.openqa.selenium.remote.RemoteWebDriver;
import org.testng.Assert;
import org.testng.annotations.Test;
public class EmailTest {
    @Test
    public void testEmail() throws MalformedURLException, InterruptedException {
        String username = "cloudbees_it-kosmopo";
        String accessKey = "XXX";
        String url = "http://" + username + ":" + accessKey + "@ondemand.saucelabs.com:80/wd/hub";
        DesiredCapabilities cap = DesiredCapabilities.firefox(); //Browserdefaults auswählen
        cap.setCapability("version", "15"); //Version des Browsers festlegen
        cap.setCapability("platform", "Windows 2008"); //Betriebssystem festlegen
        cap.setCapability("username", username); //Mein Username bei SauceLabs
        cap.setCapability("accessKey", accessKey); //Mein Access-key bei SauceLabs
        WebDriver driver = new RemoteWebDriver(new URL(url),cap);
        driver.manage().timeouts().implicitlyWait(10, TimeUnit.SECONDS);
        WebMail webmailer = new WebMail(driver, "test");
        String emailText = webmailer.getRegistrationText("mein Blog", true);
        Assert.assertTrue(emailText.contains("Benutzerkonto"), "Prüfung, ob der Registrierungstext das Schlüsselwort 'Benutzerkono' enthält.");
        driver.quit();
    }
}

WebMail.java

package de.hiorgserver.testhiorgserver;
import java.util.List;
import java.util.Set;
import org.openqa.selenium.By;
import org.openqa.selenium.JavascriptExecutor;
import org.openqa.selenium.WebDriver;
import org.openqa.selenium.interactions.Actions;
public class WebMail {
    WebDriver driver;
    String mainWindow;
    WebMail (WebDriver driver,String localPart) {
        this.driver = driver;
        String url = "http://webmail.it-kosmopolit.de/";
        String password = "XXX";
        //Öffne ein neues Fenster, dann kann ich es zwischendurch immer wieder verwenden.
        mainWindow = driver.getWindowHandle();
        JavascriptExecutor js = (JavascriptExecutor) driver;
        js.executeScript("window.open('','Email-Fenster')");
        driver.switchTo().window("Email-Fenster");
        driver.get(url);
        driver.switchTo().frame("GroupingFrame");
        driver.findElement(By.id("username")).sendKeys(localPart);
        driver.findElement(By.id("password")).sendKeys(password);
        driver.findElement(By.name("Submit")).click();
    }
    String getRegistrationText(String keywordInSubject, boolean löscheEmail) throws InterruptedException {
        if ( ! driver.getCurrentUrl().contains("http://webmailtest.it-kosmopolit.de")) driver.switchTo().window("Email-Fenster") ;
        Thread.sleep(2000); //nur für's Schauvideo angehalten.
        Actions action = new Actions(driver);
        action.doubleClick(driver.findElement(By.xpath("//*[contains(text(),'" + keywordInSubject + "')]")));
        action.perform();
        Thread.sleep(2000); //nur für's Schauvideo angehalten.
        driver.switchTo().frame("msgwindow1");
        String link = driver.findElement(By.xpath("//*[contains(text(),'Registrierung')]")).getText();
        if (löscheEmail) {
            driver.switchTo().defaultContent();
            driver.findElement(By.id("Folderdelete")).click();
        }
        Thread.sleep(2000); //nur für's Schauvideo angehalten.
        driver.get(link);
        Thread.sleep(2000); //nur für's Schauvideo angehalten.
        String text = driver.findElement(By.tagName("body")).getText();
        driver.switchTo().window(mainWindow);
        return text;
    }
}

Und hier der Testverlauf samt Video: https://saucelabs.com/tests/5e80dba5bfe74327aa68aaaefaa08737#
Hinweis: der Test würde noch schneller laufen, wenn ich nicht den Thread mehrmals schlafen gelegt hätte, damit der Programmverlauf im Video leichter nachvollzogen werden kann.
„Verschärfte“ Testbedingungen
Die Internetanwendung kann erzwingen, dass die Email-Adressen innerhalb der Internet-Anwendung eindeutig sein müssen. Dies ist beispielsweise dann der Fall, wenn die Email gleichzeitig die Bezeichnung des Users ist. Wenn ich nun gegen eine Testmaschine teste, habe ich bei einer hartcodierten Emailadresse nur einen Test frei. Jeden wiederholten/parallelen Testdurchlauf wird mir die Testumgebung quittieren mit: „Ihre Email-Adresse ist bereits vergeben“. Dann müsste theoretisch jedes Mal die Datenbasis der Testumgebung auf den „Zeitpunkt 0“ zurückgestellt werden – ein hoher manueller Aufwand!
Einen Lösungsansatz für diese verschärften Testbedingungen möchte ich an dieser Stelle nur mal skizzieren:

  1. Neuen Webspace incl. Domain erstellen
  2. als local part (wiki) einen Timestamp (natürlich nur erlaubte Zeichen) nehmen. Durch den (Millisekunden-genauen) Timestamp ist mit hoher Wahrscheinlichkeit die verwendete Email-Adresse unique. Anhand des Empfängers kann man die Emails im Webmail-Client also eindeutig identifizieren.
  3. Forward mail of non-existent user to following-default Emailadresse: test@neuedomain.de
  4. test@neuedomain.de per Webmail-client aufrufen